Child Themes
Easily apply small project-specific customizations using a YOOtheme child theme. It's a beginner-friendly way to extend YOOtheme Pro while keeping all changes preserved during updates.
A WordPress child theme is used to make modifications to any part of YOOtheme Pro. It has its own theme directory next to the yootheme directory. This way customizations are separated from YOOtheme Pro which makes them portable, replicable and unaffected by YOOtheme Pro theme updates.
Typically, a child theme is used for small project-specific customizations like:
- Add JavaScript, CSS and fonts files
- Add Less style
- Override templates files
- Add builder elements
Note To share your custom YOOtheme Pro functionality across multiple client projects with automated versioning and 1-click updates, use the YOOtheme Starter Plugin.
Create a Child Theme
To create a WordPress child theme, open the WordPress theme directory wp-content/themes and create a new folder yootheme-NAME for the child theme. The suffix is the name of the child theme, for example yootheme-mytheme.
Next, create a style.css file and add a header comment with information about the child theme at the very top of the file.
/*
 Theme Name:   YOOtheme MyTheme
 Template:     yootheme
 Author:       John Doe
 Description:  YOOtheme Child Theme
 Version:      1.0.0
 Text Domain:  yootheme-mytheme
*/
WordPress requires a unique theme name, and the Template parameter has to be set to yootheme to define that the child theme has YOOtheme Pro as parent theme.
Once the stylesheet file is created, the child theme can be activated in the WordPress theme administration. Follow the WordPress child theme documentation for more information.
Important A child theme in WordPress has its own settings which are independent of the parent theme. When activating the child theme for the first time, all settings from the parent theme are copied and applied to the child theme. This also includes the menu settings and widget assignments.
JavaScript, CSS and Fonts
To quickly load additional JavaScript or CSS in a child theme, create a js or css directory with a respective custom.js or custom.css file. These files are automatically loaded by YOOtheme Pro. To load specific JavaScript or CSS files take a look at the modules documentation.
/yootheme-NAME
    /css
        custom.css
    /js
        custom.js
To load a custom font, create a fonts directory with all the needed font files. Add a @font-face at-rule to the css/custom.css file and specify the font resources.
@font-face {
    font-family: "Custom Font";
    src: url("../fonts/custom-font.woff2") format("woff2");
}
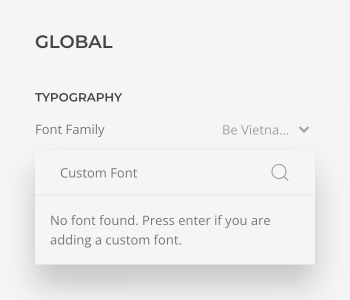
The font Custom Font can now be used in CSS. To set the font in the style customizer, open the font picker and instead of selecting one of the proposed fonts, type in the name Custom Font into the search field and hit the Enter key.
Note There is no need to add a custom font manually in the child theme if it is already available in the style customizer. This is because when a Google font is selected in the style customizer, it's automatically downloaded to the web server and stored locally. There is no round-trip to the Google Fonts server, which is great for page speed and GDPR-compliance.
Less Styles
Styles in YOOtheme Pro are built with the UIkit framework. They are written in Less and customizable through the style customizer.
To add a custom style to the style library, create a less directory in the child theme and add a file theme.NAME.less. The suffix is the name of the style, for example theme.my-style.less. Once the file is created, the style My Style can be selected in the style library.
Add a header comment with additional information at the very top of the file.
/*

Name: My Style
Background: White
Color: Black
Type: Flat
Preview: theme.my-style.jpg

*/
| Property | Description |
|---|---|
name |
Optional name which will be used instead of the file name in the style library |
background |
Value for the Background Color filter in the style library |
color |
Value for the Primary Color filter in the style library |
type |
Value for the Style Type filter in the style library |
preview |
Path to the image used in the style library |
Now either modify an existing style or one of its variations, or start from scratch. Just import the necessary Less files and add your customizations. Learn more about overwriting Less variables, extending existing CSS rules by using mixins or adding your own CSS rules in the UIkit themes documentation.
Modify a Style
The easiest way to create a custom style is to customize an existing one. Just import a style into the Less file and add your customizations.
// Import a style, for example `Fuse`
@import "../../yootheme/less/theme.fuse.less";

// Add custom Less code here
All available styles can be found in the less directory in YOOtheme Pro.
Modify a Style Variation
Each style has different variations. To start with one of them, just import the style and its variation.
// Import a style, for example `Fuse`
@import "../../yootheme/less/theme.fuse.less";

// Import a style variation, for example `dark-yellow`
@import "../../yootheme/vendor/assets/uikit-themes/master-fuse/styles/dark-yellow.less";

// Add custom Less code here
All style variations can be found in the corresponding style vendor/assets/uikit-themes/master-NAME/styles directory in YOOtheme Pro.
Import Texture Images
Some styles use texture images to decorate section overlaps or element borders. To use these textures from the original LESS style they need to be imported. Add a file config.php to the child theme directory and import the images.
return [
    'theme' => [
        'styles' => [
            'imports' => [
                'textures' => \YOOtheme\Path::get('../yootheme/vendor/assets/uikit-themes/master-pinewood-lake/images/*.svg'),
            ]
        ]
    ]
];
Start from Scratch
To create a style from scratch, all necessary files need to be imported separately. This includes platform and theme specific styles, the UIkit framework and the Master UIkit Theme.
// Import platform specific styles for Wordpress or Joomla
@import "../../yootheme/less/platform.less";

// Import the UIkit framework
@import "../../yootheme/vendor/assets/uikit/src/less/uikit.less";

// Import the `Master` UIkit theme. It extends UIkit with variables and mixins for YOOtheme Pro.
@import "../../yootheme/vendor/assets/uikit-themes/master/_import.less";

// Import YOOtheme Pro theme specific styles
@import "../../yootheme/less/theme.less";

// Add custom Less code here
Template Files
Template files, for example the index, header, menu or widget templates can easily be customized. Simply add a template file to the child theme, and it will override the exact same file in YOOtheme Pro. It’s recommended to copy the original file from YOOtheme Pro to the child theme and start modifications from there.
Any WordPress template file can be included in the child theme, not just the ones from YOOtheme Pro. Learn more about how to override the different template files in the WordPress template hierarchy documentation.
Here is an overview of all template files in YOOtheme Pro.
Theme Templates
The following template files serve as entry points to the WordPress site.
| Template | Description |
|---|---|
index.php |
Render blog pages. Used if no other matching template file is found. |
archive.php |
Render archive pages. |
search.php |
Render search results pages. |
single.php |
Render all single posts. |
page.php |
Render all pages. |
404.php |
Render 404 pages. |
The actual theme layout can be found in the header.php and footer.php files. All above mentioned template files include the header.php file before their content output and the footer.php file afterwards.
| Template Partial | Description |
|---|---|
header.php |
Render the toolbar, header, top and main sections of the theme. |
footer.php |
Render the sidebar, bottom and footer sections of the theme. |
The following template partials are used across the template files.
| Template Partial | Description |
|---|---|
comments.php |
Render comments. Included in single.php and page.php. |
commentsform.php |
Render the comment form. Included in comments.php. |
templates/post/content.php |
Render posts. Included in index.php, archive.php and single.php. |
templates/post/content-search.php |
Render results on search pages. Included in search.php. |
templates/post/content-none.php |
Render a message if posts cannot be found. Included in index.php, archive.php and search.php. |
templates/post/content-page.php |
Render pages. Included in page.php. |
templates/meta.php |
Render the meta information. Included in all post templates. |
Section Templates
The following template files render the different sections.
| Template | Description |
|---|---|
templates/section.php |
Render the section for the top and bottom areas. |
templates/sidebar.php |
Render the sidebar for the sidebar area. |
Header Templates
The following template files render the different header layouts.
| Template | Description |
|---|---|
templates/header.php |
Render the header and its navigation. |
The following template partials are included by the header.php.
| Template Partial | Description |
|---|---|
templates/toolbar.php |
Render the toolbar. |
templates/header-mobile.php |
Render the mobile header and its navigation. |
templates/header-logo.php |
Render the logo. |
templates/search.php |
Render the search toggle and field. |
templates/socials.php |
Render the social icons. |
Widget and Area Templates
The following template files render the widget area layouts.
| Template | Description |
|---|---|
templates/position.php |
Render the area. |
templates/module.php |
Render the widget. |
Menu Templates
The following template files render the different menus.
| Template | Description |
|---|---|
templates/menu/menu.php |
Render the menu. |
templates/menu/nav.php |
Render menu items for the vertical nav. |
templates/menu/navbar.php |
Render menu items for the navbar. |
templates/menu/subnav.php |
Render menu items for the subnav. |
templates/breadcrumbs.php |
Render the breadcrumb navigation. |
templates/pagination.php |
Render the pagination. |
Builder Elements
To add a custom element to the page builder, create a builder directory in the child theme and copy the custom element into it. It will be loaded automatically by YOOtheme Pro and will be available in the element library. For more information on how to create a custom element read the elements documentation.
Extend Functionality
To extend YOOtheme Pro with custom functionalities, add a file config.php which returns an array with a module definition to the child theme directory. It will be loaded automatically by YOOtheme Pro. For more information read the modules documentation.
<?php

return [

    // Module definition

];
To organize extensive customization in multiple modules, their module definitions can be loaded in the config.php file using the $app->load method. For example, create a modules directory that will contain all modules each with its own directory.
<?php

$app->load(__DIR__ . '/modules/*/bootstrap.php');

return [];
Widget Areas
New widget areas can be added by extending the theme configuration in the module definition. For more information read the modules documentation.
