CSV Importer
This is a short instruction on how to import data in your ZOO extension using a CSV file.
Note You can only import data from elements of the type Text, Textarea, Email, Link, Date, Country, Gallery, Google Maps, Image and Download.
Prepare Your CSV File
- To avoid format mismatches be sure that your CSV file is UTF-8 encoded.
- It is up to you whether you put column headers in the CSV file or not. This will be requested during import.
- Make sure you know the field separator and the field enclosure of your CSV file.
Note Applications use different field separators and the field enclosures for exporting to CSV files. Simply open your CSV file in a text editor and check the chars there.
Import the CSV File
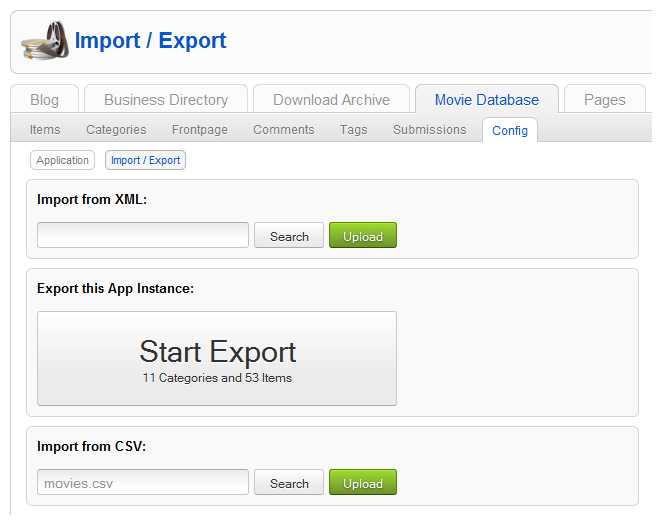
Go to ZOO administration and click on the app you want to import data to.
- Click on Config in the menubar and click on the Import/Export button.
- In the section Import from CSV click on Search and choose the CSV file on your computer.
- Click on Upload.

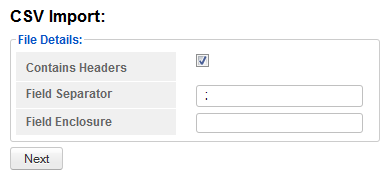
Choose whether your CSV file contains column headers or not.

Type in the field separator and the field enclosure of the CSV file. In this example we import a CSV file created by MS Excel, so the field separator is ";" and there is no field enclosure.

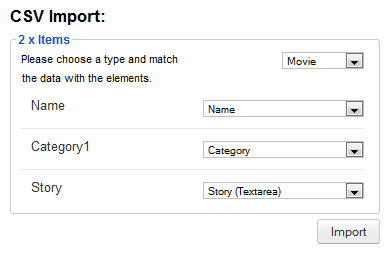
In the next screen you have to assign the data in your CSV file to an item type of the app.
- Choose the correct item type in the dropdown at the top.
- On the left you see the columns of your CSV file and on the right dropdown fields to assign them to elements of the item type.
- Choose corresponding elements for each CSV column to import the data to.
- Click on Import
The newly imported items should appear unpublished in the item manager.

If you want to assign data to repeatable elements, you can simply assign multiple columns to the same element (e.g. Textareas).
Importing Images
If you want to import images you have to upload them to a folder in your Joomla installation (e.g. images/stories) and put the path to the image in the CSV file, e.g. images/stories/movie1.png.
Importing Into Categories
If you want to assign the imported items to more than one category, just create one column for each category in your CSV file and assign both columns to the same element (in this case "Category").
The CSV Importer will look for existing categories in your application, that have the same name and if found, will assign items to these categories. If there is no existing category, a new category will be created.
If you want to assign the item to a specific existing category, you can provide a category alias. Use three pipes to separate name and alias: CATEGORY_NAME|||CATEGORY_ALIAS.
If you want to assign the item to a subcategory, you can separate a category tree through three slashes in the form: CATEGORY_PARENT///CATEGORY_CHILD.
Updating Items
If you want to update existing items, you'll have to map the ID field of your CSV data to the ID field of the chosen type. If an existing item by this ID is found in the application, the item is updated. Mapping ID to ignore will create new items, also if there is no item found by that ID in the current application.
If you want to see an example, use ZOO CSV Export feature and check the resulting CSV file.