Select Element
In this tutorial you learn how to configure a select element with its specific values to use it in ZOO.
How you create an element like this, we show you in this tutorial.
Configuration

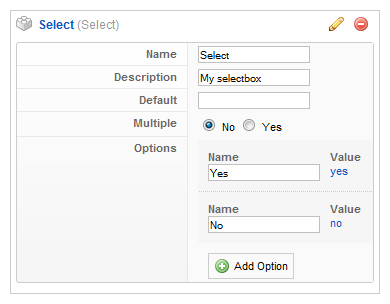
Here is the description of the different values:
Name: Type in the name for this element which will be used later on, for example in the item creation view or as label in the frontend. With the name you also can identify the element, when you assign it to a template position.
Description: The description will show up as a tooltip in the item creation view.
Default: When you create an item, the default value is automatically set for this element. In the radio element the default value has to be one of the options (see description of the Option field).
Multiple: Choose, whether you can select more than one value of this select element during item creation (see step 3).
Option: By clicking on Add Option you can add new options to this element. When you type in the name, the value is generated automatically. Usually you do not have to edit the value, but if you want to change it, simply click on it and type in a new one. By hovering the options, small icons for sorting and deleting appear.
Element Assignment

Every element has to be assigned to a template position to show up for the visitors in the frontend of the site. See this tutorial how to assign elements to the template positions.
You can set whether the label is shown in the frontend or not. If you choose Yes the name of the element (see previous step) is used for it. If you do not want to use the elements name as label you can type in an alternative. Of course the Show Label option have to be enabled to show the alternative label.
If you show more than one value in the frontend you can set how the values are separated. You can choose between different chars like comma or pipe or the values can be wrapped by a html element like a div or a li.
Item Creation

This is how the element looks when you create an item. See this tutorial for creating an item. The name of the element is shown on the left and the options on the right.